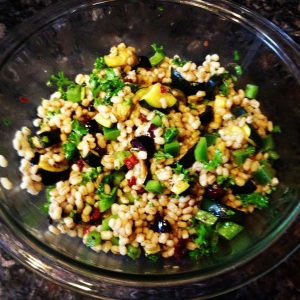
Roasted Zucchini Mediterranean Barley Salad

Standard

I’ve been gone from my blog for about 6 months, but I never stopped sewing! I decided that it was about time I got back on here to document my life again.

In the last 6 months, I’ve been working hard like all the other third year medical students out there doing my rotations. I also trained for a half marathon and ran it last weekend! Now that the majority of the year is over, and I’m approaching that phase where I chose what I want to do with my career, I can proudly say that I will become a Pediatrician! 🙂

I have another board exam coming up in three months and all the fun of applying for residency waiting for me. In keeping up with maintaining a high energy level throughout the process, eating healthy sounds like a crucial habit I should continue to follow. That being said, I would like to introduce you to this barley salad filled with Mediterranean flavor!

photo-12

Roasted Zucchini Mediterranean Barley Salad

Ingredients

  • 3/4 c          Pearled Barley
  • 1                  Zucchini
  • 1/2 c           Curly Parsley
  • 1/2              Bell Pepper (Green, Yellow or Red)
  • 8 pieces     Kalamata Olives
  • 4 pieces     Sun dried tomatoes that comes dried in a bag (can also use the ones in oil)
  • 1/4 c           Crumbled feta cheese (optional)
  • 2 tbsp         Olive Oil
  • 2 tbsp         Fig balsamic vinegar (I got mine from the bulk section at Whole Foods)
  • 2 tbsp         Red Wine Vinegar
  • 1 tsp            Honey
  • Salt and pepper for seasoning

Instructions:

  1. Heat up the oven to 425F
  2. Boil hot water in a pot with some salt and bring to a boil. Throw in the barley and cook until tender, about 20-30 minutes
  3. Chop up the zucchini in about 1/2″ pieces and toss in 1 tbsp of olive oil not listed above. Place in a pan lined with parchment paper and bake for about 20 minutes
  4. Make the dressing: Minced up the sun-dried tomatoes and place in a small bowl. Add vinegar, honey, and the olive oil to the bowl. Season with salt and pepper, and set aside.
  5. Mince up the parsley, and dice the bell pepper and olives.
  6. Once the roasted zucchini and barley is done cooking, combine all ingredients in a bowl and toss with the dressing.
  7. If you are using crumbled feta, add them in here, at the end

A simple and refreshing side that goes well with any protein of choice. I decided to leave the cheese out, since I wasn’t really feeling it today, and I didn’t think it was lacking. Time to go enjoy my spring break 😉

Happy cooking!

-S
My recent purchase: Boots

Standard

Can a girl have enough shoes? The answer is… No. I already have a pair of brown boots that my mom gave me a while back that I absolutely LOVE, but that is exactly the reason why I will not be wearing those to work…

So, I felt that I needed to invest in decent brown boots this season for when I’m in California over the winter as well as to purchase a nice pair of cute boots to wear to work.

They are the Kelly & Katie Nahla Boot, and let me tell you WHY these boots are awesome!

It’s Flannel inside!!

Has cute buckles!

Lastly, the calf circumference is less than 15″. 15″ seems to be the standard these days, but I think it’s too wide. It looks sloppy even when worn with jeans tucked in the boots. This is probably one of those problems that comes from being shorter than average 😦

All that being said, I am so happy to have found these pair! I know it’s still like 80 degrees F in Houston right now, but I’ll be looking forward to the colder weather about to roll through soon enough 🙂

Till next time!

-S

Retro Print Skirts

Standard

I love retro prints, so I bought a couple that caught my eyes, and turned them into skirts!

One of them is from the Amy Butler Cameo Hopscotch in Lake :

The other is also Amy Butler Daisy Chain Dandelion in Rose :

Here are the two skirts:

I drafted my own skirt pattern. I added a side invisible zipper, and I have slits in the back of the skirts. There are several tutorials out there that are good to learn how to draft your own skirt pattern. This one from House of Marmalade looks pretty thorough and easy to follow 🙂

The shade of colors in the swatch online is definitely different from the actual fabric, but oh well… It still looks pretty and I like all the colors!!


Till next time!

-S

Flowy polka dot blouse

Standard

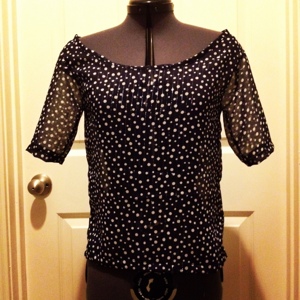
I got this fabric from the April Johnston Project Runway fabric line at JoAnn. I pinned a Target blouse that I own on to the fabric and that’s how I got the shape for the blouse. The target blouse was a teeny bit too big on me so I made this shirt a little smaller, and I’m glad I did! Since this fabric is sheer and also untangles very easily, I used a French seam to construct the blouse.

20120921-123006.jpg

It’s flowy, and once again, it’s a blouse that can be worn both at work and for casual occasions. I like the way it turned out, for sure 🙂

Also, the other day, I came across a blog with great tutorials on sleeve attachment and pattern alteration/ drafting. I should definitely use her website the next time I need advice on sewing techniques 🙂 Here’s the link to ikatbag’s tutorial.

Till next time!
-S

More colors

Standard

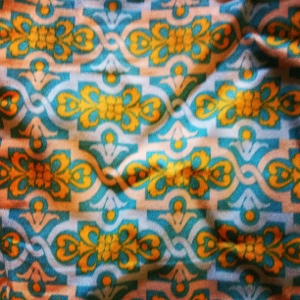
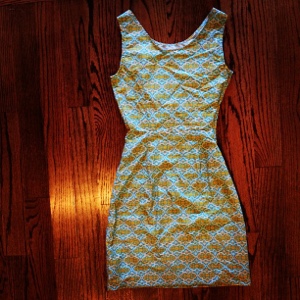
I feel like I’ve been using the McCall’s 5972 pattern a lot lately, but i think that’s quite all right 🙂 it’s always nice to have a pattern that can be turned into many different versatile clothing. I just wanted to make a simple dress, since this fabric was already screaming out at you

20120921-121839.jpg

, so just kept it simple:

20120921-121950.jpg

Pardon me for the wrinkles. My iron was just sooooo far away… I know that’s a bad excuse, but I promise I’ll iron it before I wear it 😉

Till next time!

-S

Cowl neck top

Standard

I saw cowl neck tops at a clothing store the other day, and I really want one but it was $70… Me not being able to afford that kind of money on a tiny bit of stretch cotton, I decided to make my own! I mean, this cowl neck top was literally a collar attached to a T-shirt! So, I folded my T-shirt in half placed over my stretch cotton that was folded in half and cut a pattern out of it. I wanted a top with no sleeves, so left the sleeves out. Then, using the arc of the neckline of the cut out bodice fabric, I made a collar that flared out.

This is what I got:

I made it with a super soft stretch cotton fabric I found on sale at Hancock Fabric a while ago. So soft and so comfy! I had to immediately make another one in black, so I did 😛 Considering how it takes less than an hour to construct this top, and I had extra black stretch cotton on hand, it made sense to make another one! Right??

I just love having new clothes to wear to work!

Till next time!

-S

Peter Pan Collar Blouse

Standard

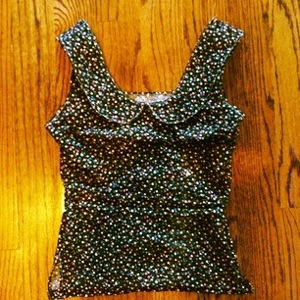
I bought this Marc Jacob cotton fabric a while back not sure what I was going to make out of it. As I was looking through my closet, I realized that I didn’t really own many things that were black or a Peter Pan collar. So, I decided to make a fitted Peter Pan collar blouse.

I used the bodice pattern from one of the dresses, I think McCall’s 5972, and extended the bottom part as well as flare it out so that I can turn it into a shirt. I traced the neckline and made Peter Pan collar based on the tracing. Then, i decided to insert a side zipper and this is the result I got:

20120920-141136.jpg

It looks much better on than when it’s lying on the ground like that 😛 it’s cute with shorts, pants, and skirts. Because it’s a fitted top, I can even tuck it in a high waisted skirt without having to worry about the bulkiness 🙂 I really like this top because I can wear it super casual on the weekend, or make it business casual for work with a cardigan over it. I also believe that white coats make casual clothing about 10x more professional looking, so I guess I kinda lucked out a little in that regards as far as work appropriateness goes!

Especially because I’m currently on my Pediatrics rotation, a fun flowery top like this seems quite appropriate.

Till next time!
-S

Bulgogi Fries

Standard

Here in Texas, we have many Korean Mexican fusion food trucks. To name a few: Coreanos, Chi’Lantros, Oh My Gogi!. All these food trucks have this glorious dish called Kimchi fries or Bulgogi fries or whatever. It consists of french fries, a blend of cheese, marinated pork, chicken, or beef, cilantro, and some sort of gochujang based salsa roja, sour cream/mayo based creamy Sriracha gochujang sauce (this is what makes the fries super special!) My favorite amongst the three food trucks mentioned above is hands down Oh My Gogi!

As much as we love to go out and get these amazing fries on a Friday night at one in the morning after being out for a while, my boyfriend and I decided to create these amazing fries at home, and maybe heath-ify it a tad while we’re at it 🙂 We healthified it by using oven baked fries, and low fat mayo and yogurt in the creamy sauce instead of full fat mayo and sour cream.

I discovered that I like my Bulgogi fries with lots of the creamy Sriracha gochujang sauce and some caramelized onions on top! yummmmm…. The recipe seems a little involved, but it’s not that bad considering how there is a bit of down time while making the fries. Decorated by my boyfriend. Theme’s apparently polka dots 😛


Well, here’s our recipe:

Bulgogi Fries

Serves 2

  • Caramelized onion (1tbsp grape seed oil + 1/2 cup onions thinly sliced)
  • Cilantro, handful
  • 2 oz Colby Jack cheese
  • 1oz Sharp cheddar cheese

Bulgogi

  • 2/3lb ground beef or thinly slice rib eye
  • 1tbsp soy sauce
  • 1tbsp sugar
  • 1tsp sesame oil
  • 1tsp gochujang
  • 1tsp toasted sesame seeds
  • pinch of white pepper or fresh ground pepper
  • pinch of garlic powder
  • pinch of onion powder
  • pinch of salt

Fries

  • 4 small/medium russet potatoes
  • 2 tbsp olive oil

Creamy Sriracha/Gochujang sauce

  • 1/3 cup low fat mayo
  • 1/3 cup non-fat yogurt (I like Stonyfield)
  • 10 drops of Sriracha
  • Gochujang to taste (we like to use about 1/2 tbsp to 1tbsp)
  • Milk to thin out sauce (optional)
  1. Boil water in a pot for potatoes.
  2. Pre-heat oven to 420F
  3. Combine the marinade and throw in the meat. If using ground beef, make sure to mix in the marinade into the ground beef really well, preferably using your hands. Marinade meat for at least 30min-1hr.
  4. Cut potatoes into strips (we like ours a little on the thicker side)
  5. Throw potatoes in the boiling water for 10 minutes. Drain potatoes and dry very well with paper towel, then coat the potato with olive oil.
  6. Place potatoes on a cookie sheet and throw it in the oven for about 15-20 minutes depending on how thick/thin you cut your fries. Make sure to flip the potatoes once during the baking process
  7. Heat 1 tbsp of oil on a pan and throw in 1/2 cup of sliced onion, and caramelize them
  8. Make the creamy sauce by combining all the ingredients listed above until you reach your desired consistency, then place in the refrigerator
  9. Cook the meat either in a pan or on a grill (we like using the grill: if we use ground beef, we make them into really thin patties and throw them on the grill, then we chopped them up before topping off our fries)
  10. Shred your cheese, and chop up your cilantro
  11. Once the fries are done, pile your fries on top of each other on the cookie sheet, throw on the cheese and let it melt in the oven for about a minute
  1. Scoop up your cheesy fries on a plate, top it with some creamy sauce, top it with some meat, caramelized onion, maybe some more sauce, then cilantro! Top it with more Sriracha sauce if you really like your fries super spicy!!

and, there you have it! Dig in, and enjoy 😉

I think we make this once a week around here… we are hooked… haha

Till next time!

-S

Vintage Print Fabric & Buttons

Standard

As a part of my desire to update vintage fashion – as in, find cute vintage print fabric and make a dress out of it – I decided to turn this fabric into a Peter Pan Collar dress with vintage pearly buttons. I forget where I got my fabric from… I think it may have been from Fabric.com or the Quilted Castle.

I decided to base the bodice and skirt from McCall 5972, and made my own Peter Pan Collar based on that pattern. I also added a waist band and a faux button hem in the middle of the dress to mimic and overlay of fabric, and attached buttons down the middle of the front bodice.


It’s a fun, super girly dress that makes me happy! kind of appropriate for Pediatrics, don’t you think? 😉


Till next time!

-S

Mint Green & Ivory

Standard

and my lace obsession continues…. Here I have an Ivory lace and mint green dress 🙂

With belt:

Without belt:


It’s an ivory lace bodice with a mint green skirt. I think it’s a classic color combo for spring and summer. Since Houston is so warm all the time, I think I can get away with extending my spring/summer attire a little ways into the chronological “fall” time of the year 😛

I used a pattern based on Mc Call 5972, made two bodices, used this tutorial on lining dresses to create this piece. I’m overall satisfied with the very feminine feel of this dress. I also really like the sateen stretch cotton I used for the skirt. The cotton lace was a purchase from my spring break trip, and the sateen stretch cotton was purchased from Fabric.com.


I’m so excited to have new clothes to wear again! This was something I didn’t have to 1) worry about because I was in scrubs all the time, and 2) did not have the time to pursue, during my surgery rotation. Yay sewing!

I forgot how soothing and relaxing sewing is in my life…


Till next time!

-S